For years, the Marine Corps has recognized the critical need for units at all levels to effectively operate within the electromagnetic spectrum. The ongoing Russo-Ukraine War underscores this necessity and reinforces it through regular service-level training exercises. To excel in this domain, units must first understand their own electromagnetic signature and then detect that of the enemy. Mastering both capabilities allows a unit to minimize its vulnerabilities while capitalizing on opportunities.
Currently, the Marine Corps boasts sophisticated and highly capable systems for spectrum operations. However, these systems are scarce within the ground combat element and are not often available for small-unit operations at the Company level and below. Thankfully, there are practical, cost-effective solutions available to small unit leaders. While these alternatives do not match the precision of exquisite systems, they offer valuable capabilities that can be leveraged by small units.
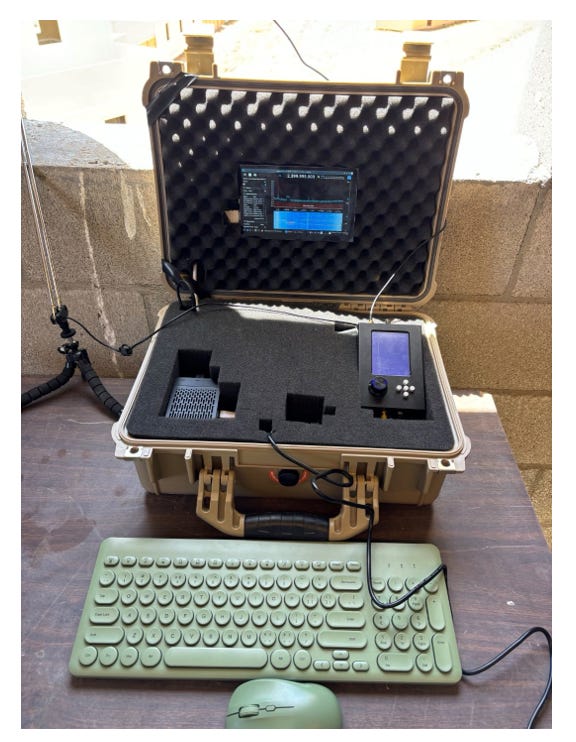
To address this need, we have developed a spectrum analyzer called the Grunt Spectrum Box (GSB). This device enables small units to operate effectively in the spectrum at the platoon or even squad level. Constructed by instructors at the 1st Marine Division Schools’ Signature Management Leaders Course, the GSB was assembled in just 3 hours with $628.77 worth of components sourced entirely from Amazon. It has proven beneficial for both assessing own force signatures and detecting adversary signatures, including those from unmanned aerial systems.
What a Spectrum Analyzer Does
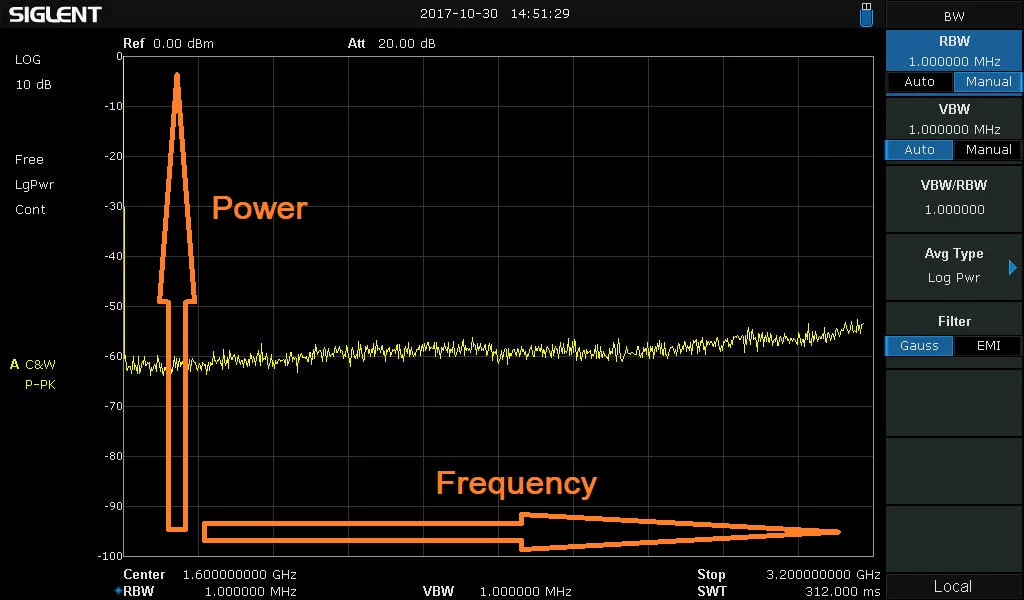
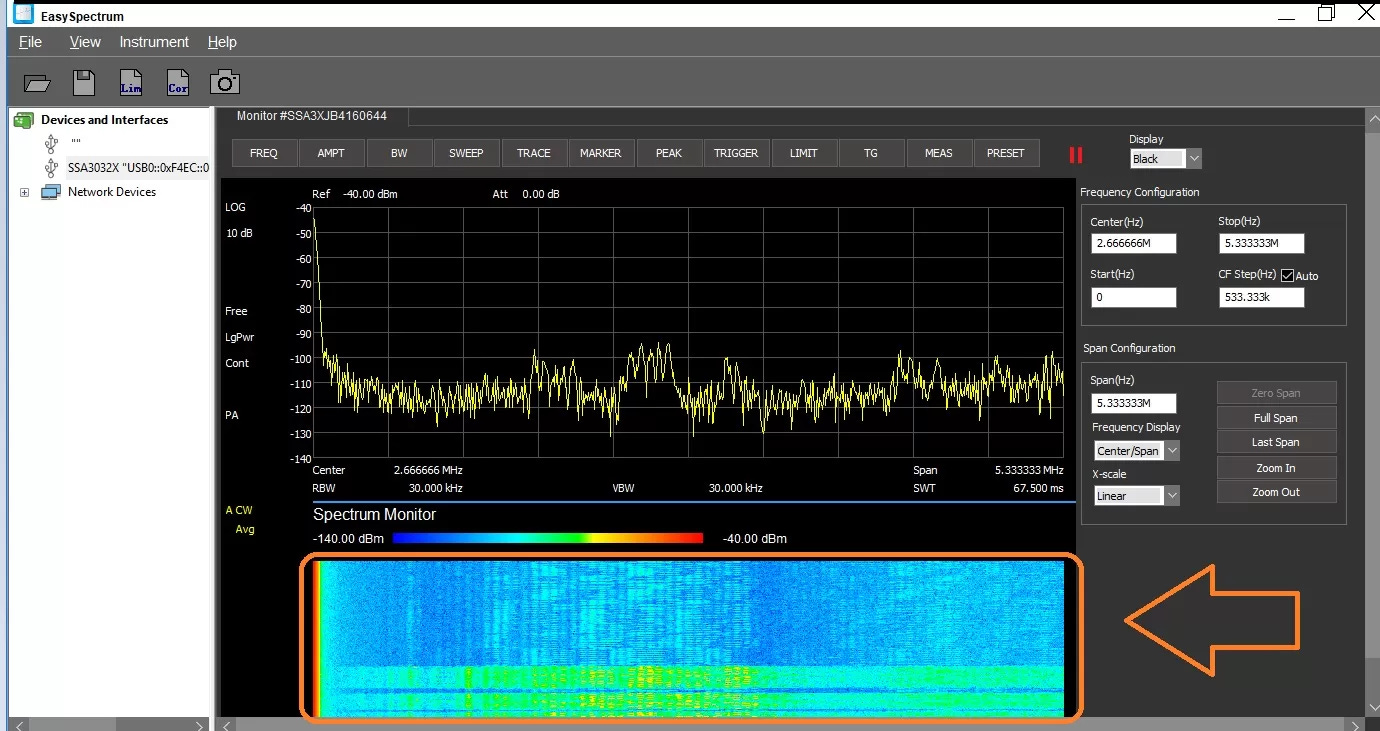
A spectrum analyzer is a device that detects radio signals and plots them on a display. It passes the electromagnetic spectrum through a “window” and plots the spectrum on generally one of two charts, visualizing what is currently happening in the electromagnetic spectrum within a given frequency range. The first chart is most commonly what you see when looking at a spectrum analyzer and maps strength of the signal received in the y-axis and frequency in the x-axis. The second “chart” is commonly referred to as a “waterfall” which displays what has happened over time. This is where you will see frequency hopping and other similar signals. It “paints” a strength vs time graph.
Cheaper options do exist, such as the “TinySA”, and are a good option. However, they are limited in what they can sense, how they visualize it, and what they can do with that signal. The cheaper options also often lack hardware capabilities which limits how fast it can pass the spectrum through the “window”. This means that you may or may not see frequency hopping or other signals that are emitted for fractions of a second making it challenging for the naked eye to see. Most less expensive options generally lack modularity/adaptability which is often a big buzz word for military equipment, but in this case it means that the GSB can monitor two different frequency ranges at once, a capability that less expensive options often can’t provide. The GSB can also demodulate (extract data from some signals). Finally, since it runs on an operating system, it is expandable in both software and hardware. If $650 dollars is unobtainable then I would advocate that having a cheap spectrum analyzer is better than not having one at all.
How to Build Your GSB
As follows, are step-by-step user-friendly instructions that any Marine or Sailor can follow to build the GSB. This list provided below is what the author paid at the time of building, but prices and availability may change.
HackRF One with Portapack
https://www.amazon.com/dp/B09PKL1WTH
Price: ~$300
NOTE: At the time of writing, the Amazon seller purchased from is no longer selling them and thus the difference in price. Some HackRFs on Amazon are knock offs and that is fine. The original HackRF can be found here. The original does not have a user interface provided by the Portapack. The author used a knock off and recommends one with the portapack. An alternate source for HackRF with portapack assembled and tested in the USA is Rabbit-Labs.com
The HackRF One is a Software Defined Radio (SDR) which can both transmit and receive signals from 1 MHz to 6 GHz. It was originally designed by Great Scott Gadgets for testing and development of radio technologies. It is open source and can be standalone. For spectrum analysis, it lacks hardware processing capabilities as a standalone unit to display the Electromagnetic Spectrum (EMS). It is advertised for up to 20 million samples per second. The open-source reporting reinforces the HackRF’s utilization and it has seen a lot of use in Ukraine for detection and direction finding. Its specifications can be found in both links and due to its popularity, it has a large base of tutorials both officially by its creator and the online community in the form of YouTube videos and forums.
Due to the Portapack running the HackRF as a standalone, the author recommends the installation of Mayhem. Mayhem Firmware is an open-source software developed to complement the Portapack and is available at Github. The portapack is needed to use Mayhem but allows flexibility in case the Raspberry Pi goes down. The Mayhem firmware has many available applications and would require a separate guide, but key features include spectrum analysis, signal scanning, ADS-B (aircraft location) demodulation, “Jamming” and now has a direction finding feature called Foxhunt though it is still under development.
RTL-SDR
Price: ~$40
The RTL-SDR V4 software defined radio receiver with RTL2832U ADC chip, R828D tuner, built in HF upconverter, improved filtering, and an aluminum case with passive cooling. It tunes from 500 kHz to 1.766 GHz, with up to 3.2 MHz (2.4 MHz stable) of bandwidth. The author uses this in the system as either a backup sensor or to monitor HF/VHF/UHF while the HackRF monitors another range. If you want to get into SDRs and spectrum analysis this is an easy and very cheap option. Because it has no standalone function it will need a separate computer to utilize it. The author started with a commercial laptop and eventually adapted it to work with a tablet. The applications available on a tablet are limited in their processing power and a computer is recommended.
Raspberry Pi 5 8GB
Price: ~$150
The Raspberry Pi is a standalone small computer that allows this system to interface with a screen and allows the user to process all the data coming into the spectrum analyzers. The Pi is very commonly used in small projects and robotics. The 8gb ram version is recommended. The Raspberry Pi 5 is the recommended model because it has better processing power. To utilize the Raspberry Pi, you will need to acquire Dragon OS software.
Dragon OS is a Linux based operating system that was designed specifically for SDRs and Ham Radios. It is free, open source, and has a lot of built in features and software. The creator even has a youtube channel with step-by-step instructions on how to use it for different applications.
The Raspberry Pi Imager available here. This is imaging software used to upload Dragon OS onto the SD Card for the Raspberry Pi. It is very easy to use and self-explanatory.
Screens
Any screen/monitor will work but screens advertised for the Raspberry Pi work best due to the face monitors designed for the Raspberry Pi can be powered by it alone. If you choose to use a larger screen, you may require a secondary power source.
7-inch screen featured in pictures: Link
Larger Screen that is currently installed but requires secondary power: Link
Extra Hardware
2X USB Male to USB Female: Link
RaTLSnake M6 Antenna Set: Link
Keyboard and Mouse Combo w/ 1 USB adapter
Apache 3800 Weatherproof Case (Harbor Freight): Link
Extension cord (recommended)
Portable Car invertor (recommended)
Wigle App (Android only)
Wigle is open-source software used for wardriving. Wardriving is the practice, pursued by both hobbyists and hackers, to search for and map open networks broadcasting on Wi-Fi and Bluetooth. Outside of wardriving, the Wigle App is very effective for looking for Wi-Fi and Bluetooth signals such as smart watches, phones and in some cases drones. The app is not required for construction but is nice to have running while you monitor the spectrum.
Setting Up Your Box
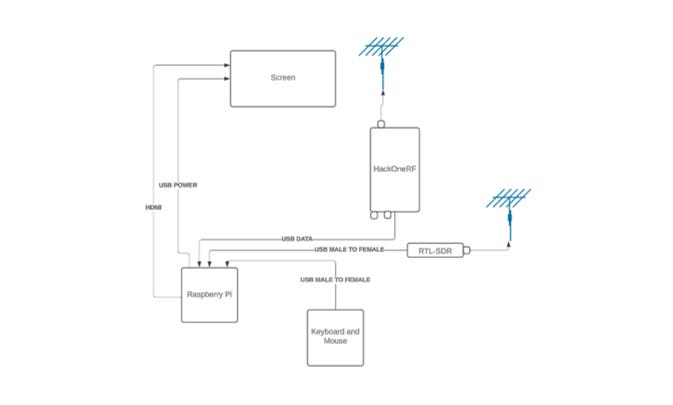
The first image above is a “wiring” diagram that shows what USB plugs go into which port. Prior to wiring, ensure you have laid out where you want the individual parts to go in the case (see 2nd image). An image of the constructed GSB will be included at the end of this document. Feel free to play around with the placement to fit any addons you may have. It is recommended to use the first layer of foam to house the parts and the area between the 1st and 2nd foam layer to manage all wires. The top foam against the lid is solid and will need to be cut if you intend to recess the screen. In its current state it does require a constant source of power. The author is working to modify it to run off of a BB2590.
Software Setup
Update the firmware on HackRF(Links at the end).
Download Pi Imager.
Download Pi Version of Dragon OS.
Insert the SD Card into a computer.
Flash the Dragon OS onto the SD Card using Raspberry Imager (How To Flash an Operating System to SD Card for Raspberry Pi (digikey.com).
Extract SD Card from computer and insert into the Raspberry Pi.
Plug in all USBs according to the diagram.
Plug a screen or monitor into the Raspberry Pi and power the Raspberry Pi.
Once the Raspberry Pi boots, the password for Dragon OS will be “dragon”
You may have to install HackRF drivers https://hackrf.readthedocs.io/en/latest/installing_hackrf_software.html
You can now open SDR++ and SDR Angel
How to Use Your GSB
This will not be a guide to reading and interpreting the displayed EMS waterfall. Simple self-directed research, working with communications Marines, and hands-on practice with the GSB will make one capable of recognizing basic signatures in the EMS, at least to the degree required for hasty own force signature assessment. Resources for getting started are at the end of this section and resources for learning individual parts of the system are in the resources section at the end of this article. The antennas used are dependent on the signal you are attempting to observe. The programs the author used are SDR++ and SDR Angel. The steps below do not include troubleshooting. There are many resources online for fixing most issues that come up.
Plug into power.
Login password = “dragon”
Put the HackRF in “HackRF Mode” by selecting the HackRF mode from the Mayhem window. The screen will change to a light blue color and have what looks like a wire diagram displayed.
SDR++ is located under what would be the windows key and “Ham radio.”
SDR Angel is located under what would be the windows key and “other.”
Click and allow to let load.
Select HackRF or RTL-SDR whichever you choose to use, and the spectrum should show.
Open the Wigle app on an android device to monitor for Wi-Fi and Bluetooth. The Raspberry Pi has Wi-Fi and Bluetooth which can be turned off like windows.
Below are two resources to get you started with understanding spectrum analysis. The best recommendation would be to use a spectrum analyzer tuned the same frequency as a PRC-152 and key out using single channel and frequency hopping observe the signal and then change power settings and observe again.
Additional References and Resources
Beginner's Guide To The HackRF & Portapak With Mayhem (youtube.com)
HackRF 101 : Everything You Need to Know to Get Started! (youtube.com)
HackRF 102 : Receiving Signals Explained! Featuring Mayhem 2.0 & Antenna Tuning Guide! (youtube.com)
The Best HackRF Portapack Firmware Yet - Mayhem Version 2 (youtube.com)
SDR ANGEL: SDRangel - YouTube
RTL-SDR: RTL-SDR V4 - Software Defined Radio (Explained) (youtube.com)
Good YouTube Channel for Dragon OS and SDRs: DragonOS Focal PublicR7 and higher Install (Download in Description) (youtube.com)
Great hardcopy text: Amazon.com: The Hobbyist's Guide to the RTL-SDR: Really Cheap Software Defined Radio: 9781514716694: Laufer, Mr. Carl: Books
Employing the GSB During Training
There are a few ways the author recommends initial training and incorporating it into your planning process. While not an exhaustive list, the recommendation is to lean on your NCOs and Radio Operators to find ways not listed. Just like in MOUT when we preach “Find a job” our ROs are often sitting in the COC on radio watch and charging batteries. This tool gives them an opportunity to be engaged and learn and become better tactical advisors now and, in the future all while providing you with tactical insights to the radio spectrum in your AO.
Self-Assessment
This can be used in your COC to monitor friendly emissions both planned and unplanned. Visualizing your own signature helps paint a picture of what the enemy sees. Several units have adopted this TTP and use high level spectrum analyzers to watch for “hot mics” and visualize their signature. Placing this with an RO who knows the frequencies friendly forces are using, especially if all or most frequencies are within the same band, helps to see what is going on in spectrum around you, how often forces are keying out, and how they are propagating. This is ultimately a visualization of your unit's pattern of life.
Red Team
Just like monitoring friendly leakage this can offer an early warning device. If you know the friendly forces frequencies and/or frequency range, then anything else could be a potential enemy emission. This also helps to narrow down enemy frequencies and once gained, a pattern of enemy life. If an audio output is attached via speakers or headset, this device can monitor and, given enough speed, record enemy plain text open communications. As more forces around the world become modern, jamming becomes increasingly present on the battlefield. This device can be used to sense enemy jamming.
CUAS
Many drones use two frequency bands for communication. 2.4 Ghz for radio transmitter to control the drone and 5.8 Ghz to send video downlink of video footage. The GSB was able to intercept and view open analog drone footage. This can serve as an early warning and give value information if the on-screen display is showing GPS Data. Due to NDAA compliance, drone information may or may not be able to be demodulated. This device is capable of intercepting analog drone footage and demodulating DJI drone emissions such as current long/lat information of the drone, the operator and its “home.” A video of this is located on the “cemaxcuter” YouTube channel. There are many variables but the HackRF and other similar devices are being used right now in Ukraine
The Way Forward
The following is the list of improvements the author is currently adding to the system and some starting areas for anyone who wants to build this and improve upon it. Ultimately, it is very capable as is and I will continue to refine this and if able submit those findings.
Expansion of the GSB to operate with Kismet allowing for on board monitoring of Wi-Fi and Bluetooth. This requires a dedicated Wi-Fi antenna.
A larger screen is needed to run 2 different programs allowing for monitoring of 2 different frequency ranges with the RTL-SDR and HackOneRf running concurrently.
Manufacturing of custom HDMI and USB to USB cables to better the cable management.
Some DF ability either automatically or with a handheld antenna.
Possible Kraken integration to allow for Direction Finding
Add a battery pack to make this a standalone unit without the need for a plug in. This could be achieved by a 2590 adapter with a stepdown to not damage the Pi.
Construct an antenna array platform to streamline wiring of antennas.
In Conclusion
While the above may seem complicated, it is within the capabilities of many of our young Marines. It is past time that infantrymen look at their emissions just as they look at their fires. As a Rifle Platoon Commander, I frequently was told to be aware of my “spectrum,” but had no ability to do that. If I had a simple tool, like the one described in this article, I would have better planned and controlled my emissions and, over time we would have exploited it to sense adversary signature as well. I encourage you to build it, get it in the hands of the right Marines, and see how it enhances your operations. I look forward to your feedback.
1stLt Lucas Scher is the Signature Management Course Chief at 1st Marine Division Schools. He can be reached at lucas.scher@usmc.mil.





1stLt Scher - Excellent article - thank you for being an "scrounge engineer". That is what I call Marines that are going to find ways to cover the gaps with bailing wire and bubble gum. I executed a project similar in nature to what you have outlined with MCWL back in 2018 called Tactical Electro-Magnetic Spectrum Operations System (TEMSOS). We used HACKRF, and created an app for android - at the time called Raptor-Tak that would allow us to see the spectrum. I would highly advise you to try and find someone from the Marine Corps Spectrum Integration Lab (MCSIL) at Point Mugu Ca. That team is responsible for the Intrepid Tiger (AN/ALQ-231) program and have a android app - that is Govt only that I think would help your efforts for the Marines. The Ukraine/Russia war is indicative of things to come and it will take Marines like you - to bring our people home. If you need anything please look me up on LinkedIn. linkedin.com/in/joshuapowell36
With such thoroughly detailed, illustrated, and cited/attached links, it's really is getting harder to claim "ignorance" to this increasingly prevalent aspect of modern warfare. Thank you for writing and article in the most layman's terms possible. You can tell a person knows their craft when they can explain the complicated to the masses. Truly outstanding article.